WordPress Revisited - Part 1
Like many developers of a certain era, I cut my programming teeth on WordPress early on in my career. I've long since moved away from the platform for personal projects, but I recently decided to take another look and see what's changed.
While developing with WordPress may be an unpalatable prospect to some, there's no denying the impact it's had on the web. It may not come up in a professional context much anymore, but we all have at least one friend or loved one with a WordPress site who needs help from time to time. Most of the time it's something small, like adding a PayPal button or some layout adjustment. When the needs start becoming more complex, the pain seems to compound exponentially. There's never a proper sandbox environment, nothing is under version control, and most things need to be done through the GUI.
I have a friend, to whom I feel a great personal debt, with a WordPress site that has complex needs that are ever growing. I'm happy to help him with these needs, but I reached a point where I was banging my head on the wall trying to work with a WYSIWYG system. I decided that I would experiment and see if I could bring some sane development approaches to the world of WordPress.
This is an ongoing experiment which I will cover in three posts.
- Development Environment
- Plugin Development
- Theme Development
Development Environment
This post will be dedicated to setting up a WordPress environment from the point of view of a professional software developer. This will be the shortest of the three posts. the repository for this post is available here
When doing a cursory search for local WordPress install techniques, it seems most things haven't changed. WAMP/MAMP/XAMPP seem to still be popular solutions. There are also a variety of click through install options that have come out over the years. I did not investigate any of these options with any vigor. They all seemed to be geared towards amateurs. I would be shocked if any of them supported something like Xdebug. I decided to use Docker Compose as the basis for my dev environment.
Dockerfile
The first step was to create the Dockerfile. This was pretty straight-forward. It just takes the WordPress FPM image and adds Xdebug support.
# This is just a simple wrapper around the wordpress image.
# All it does is setup XDEBUG in the image if the environment var WITH_XDEBUG = true.
# Defaults to false.
ARG PHP_VERSION=8.2
FROM wordpress:php${PHP_VERSION}-fpm

ARG WITH_XDEBUG=false
ARG HOST_IP_ADDRESS="127.0.0.1"
ARG HOST_IDE_KEY="PHPSTORM"
ARG XDEBUG_PORT=9003
RUN if [ $WITH_XDEBUG = "true" ] ; then \
    apk add --no-cache --virtual .build-deps $PHPIZE_DEPS; \
    pecl install xdebug; \
    docker-php-ext-enable xdebug; \
    apk del -f .build-deps; \
    mkdir /var/log/xdebug; \
    touch /var/log/xdebug/xdebug.log; \
    echo "zend_extension=xdebug" >> /usr/local/etc/php/conf.d/docker-php-ext-xdebug.ini; \
    echo "xdebug.mode=debug" >> /usr/local/etc/php/conf.d/docker-php-ext-xdebug.ini; \
    echo "xdebug.start_with_request=yes" >> /usr/local/etc/php/conf.d/docker-php-ext-xdebug.ini; \
    echo "xdebug.client_port=$XDEBUG_PORT" >> /usr/local/etc/php/conf.d/docker-php-ext-xdebug.ini; \
    echo "xdebug.client_host=$HOST_IP_ADDRESS" >> /usr/local/etc/php/conf.d/docker-php-ext-xdebug.ini; \
    echo "xdebug.discover_client_host=true" >> /usr/local/etc/php/conf.d/docker-php-ext-xdebug.ini; \
    echo "xdebug.idekey=$HOST_IDE_KEY" >> /usr/local/etc/php/conf.d/docker-php-ext-xdebug.ini; \
    echo "xdebug.log=/dev/stdout" >> /usr/local/etc/php/conf.d/docker-php-ext-xdebug.ini; \
fi ;
This takes five build arguments:
- PHP_VERSION
- WITH_XDEBUG
- HOST_IP_ADDRESS
- HOST_IDE_KEY
- XDEBUG_PORT
If you are familiar with PHP and Xdebug, these should hopefully be self-explanatory. The host IP Address,
is the address of the development machine that the docker container needs to call back to.
If you are using Docker Desktop, the actual machine local IP likely won't work and you'll likely need to set this to
host.docker.internal.
I haven't tested this. I only use Windows when I'm paid to. 😉
Docker Compose
The docker-compose.yml sets up three services.
- The WordPress code
- An Nginx server
- A MariaDB database
---
services:
  wordpress:
    build:
      context: .
      args:
        - 'PHP_VERSION=${PHP_VERSION:-8.2}'
        - 'WITH_XDEBUG=${WITH_XDEBUG:-false}'
        - 'XDEBUG_PORT=${XDEBUG_PORT:-9003}'
        - 'HOST_IP_ADDRESS=${HOST_IP_ADDRESS:-127.0.0.1}'
        - 'HOST_IDE_KEY=${HOST_IDE_KEY:-PHPSTORM}'
    volumes:
      - ./wordpress:/var/www/html
    environment:
      - WORDPRESS_DB_NAME=wordpress
      - WORDPRESS_TABLE_PREFIX=wp_
      - WORDPRESS_DB_HOST=mariadb
      - WORDPRESS_DB_USER=wp
      - WORDPRESS_DB_PASSWORD=password
    depends_on:
      - mariadb
    networks:
      - wp-dev

  nginx:
    image: nginx:latest
    ports:
      - "${WORDPRESS_PORT:-8080}:80"
    volumes:
      - ./nginx:/etc/nginx/conf.d
      - ./wordpress:/var/www/html
    networks:
      - wp-dev
    depends_on:
      - wordpress

  mariadb:
    image: mariadb:latest
    volumes:
      - wp-data:/var/lib/mysql
    environment:
      - MYSQL_ROOT_PASSWORD=password
      - MYSQL_USER=wp
      - MYSQL_PASSWORD=password
      - MYSQL_DATABASE=wordpress
    ports:
      - 3306:3306
    networks:
      - wp-dev

networks:
  wp-dev:

volumes:
  wp-data:
The wordpress service pulls all the WordPress PHP code from the Docker image and places it in a folder named
wordpress. This is configured to the container volume /var/www/html, so all changes locally are reflected in the
container. It passes environment variables with the same names as the build args when creating the image.
The rest of the configuration stuff here is for the database connection and is currently hard-coded.
The nginx service just uses the latest Nginx image. It maps the local file nginx/localhost.conf as a volume,
as well as the same wordpress volume used in the PHP container.
Here is the Nginx server config file in nginx/localhost.conf
upstream wordpress {
    server unix:/tmp/php-cgi.socket;
    server wordpress:9000;
}

server {
    listen 80;
    server_name localhost;

    root /var/www/html;
    index index.php;

    access_log /dev/stdout;
    error_log /dev/stderr;

    location / {
        try_files $uri $uri/ /index.php?$args;
    }

    location ~ \.php$ {
        try_files $uri =404;
        fastcgi_split_path_info ^(.+\.php)(/.+)$;
        fastcgi_pass wordpress;
        fastcgi_index index.php;
        include fastcgi_params;
        fastcgi_param SCRIPT_FILENAME $document_root$fastcgi_script_name;
        fastcgi_param PATH_INFO $fastcgi_path_info;
    }
}
This sets Nginx to serve FPM files from port 9000 of the wordpress container.
The last thing is just to add a .env file locally. The repo comes with a sample file.
# copy this file as .env and edit if you want to override default behavior.

# PHP Version to use. Affects which WordPress image gets pulled.
PHP_VERSION=8.2
# Port on the dev machine under which to run WordPress.
WORDPRESS_PORT=8080
# Enable XDEBUG
WITH_XDEBUG=true
# Set this to the IP address of your development machine.
HOST_IP_ADDRESS=192.168.1.100
# Change to your IDE's default XDEBUG key, e.g., VSCODE.
HOST_IDE_KEY=PHPSTORM
# Change if you have a port conflict with the default Xdebug port.
XDEBUG_PORT=9003
Now, when you run docker-compose up, you should be able to access WordPress at http://localhost:8000.
Debugging
If you set the environment variables to enable Xdebug, you should be able to configure your IDE to debug from within the running container.
Configuring an IDE to work with Xdebug over Docker can be tricky. Here are some helpful articles.
I'll cover briefly a basic setup using PhpStorm.
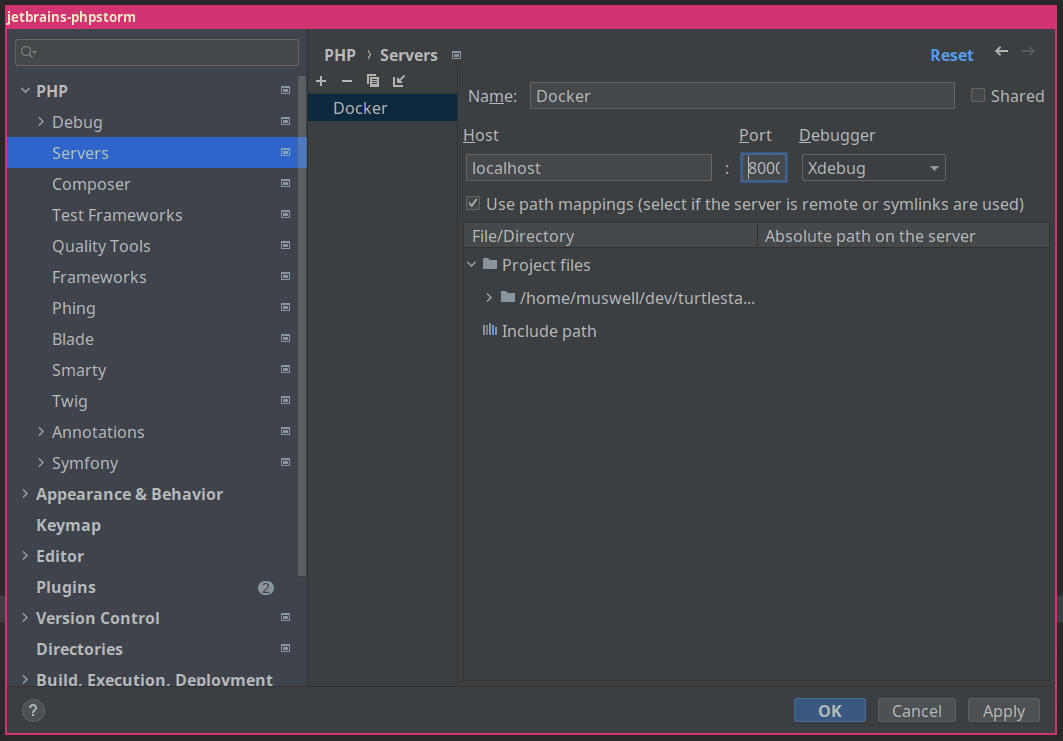
First you will need to configure a server. Go to File -> Settings -> PHP -> Servers and add a new one. Give it a name
like Docker, set it to localhost, with the same port as $WORDPRESS_PORT and select Xdebug as the debugger.
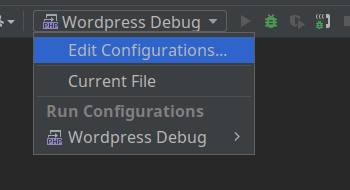
Next Select Edit Configurations from the configuration dropdown.
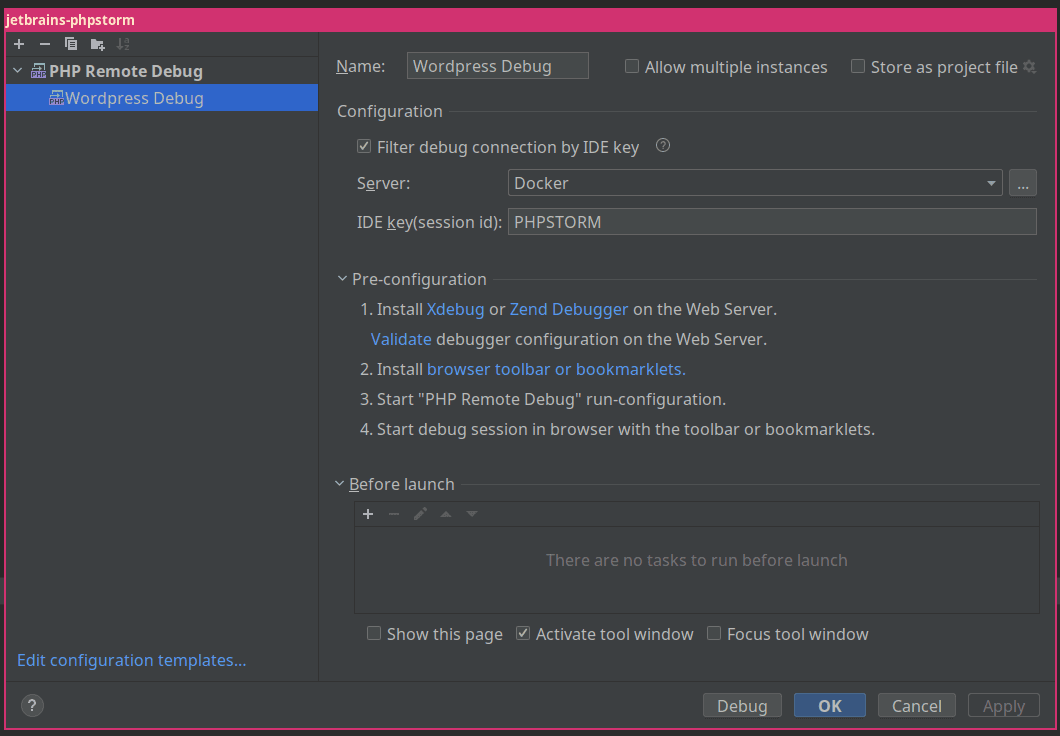
Then in the edit configurations dialog, click the add button and select PHP Remote Debug. Choose the server you
added in the previous step.
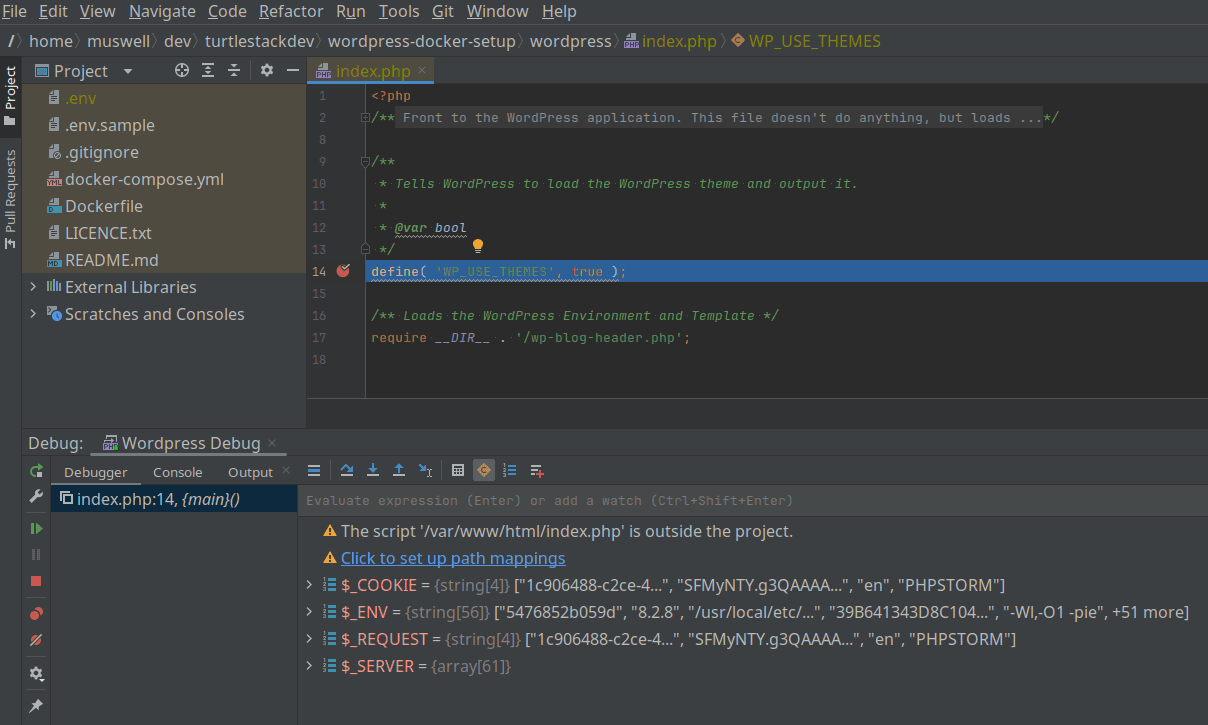
Start the debugger, add a breakpoint, and visit the page. You should hopefully get something like this.newRemote
That's all for this article. There's still a lot to be desired from this setup, but it's a good start. Stay tuned for follow-up posts.