Bootstrapping WSL: Linux for the Faint of Heart
I've heard WSL referred to as the best of both worlds between Windows and Linux. As a Linux enthusiast, I haven't found it to be quite that, but I recognize that not every developer lives for a tiling window manager with Vim keybindings. Most would prefer minimal interaction with the terminal. For me, the real value of WSL is in team environments of mixed skill sets.
One mistake I've made working on software teams is to overvalue my preferred tools and eschew what others are using. It's a self-limiting attitude for a developer to hold. In a constantly evolving field, restricting your exposure to technology that you, yourself seek out sets you up to be left behind. For a team leader, this mindset untenable. If you don't make a dedicated effort to familiarize yourself with the tools of your team and how they use them, you'll find yourself investing way more time than necessary helping to troubleshoot developer environment issues.
The majority of the time that I need to work with other developers, they are working on Windows and using VS Code. In this post I will explore how I've tried to empower developers to make the best use of this environment and get everyone on the team on a similar baseline. The code for this post is available here.
This post works from the assumption that a fresh WSL Ubuntu instance has been installed on the developer machine, as well as Docker Desktop, and VS Code. These prerequisites will not be covered. For optimal results, it's best to sit down with an inexperienced or CLI averse developer and walk them through the setup process.
One of my aims in creating this bootstrap was to enable the user to make use of it with minimal interaction from the terminal. With that said, initial system setup may also be an optimal time for a gentle primer on the command line. After WSL is installed, consider teaching them some basic commands and putting together a small cheatsheet. The terminal can seem like a mystical black box for voodoo sorcerers. A change in attitude from anxiety to comfort starts with small steps.
Getting Started
The first step is for the developer to clone the repo into WSL. It is possible to do this from the GUI. VS Code has
a big blue clone repository button. The user just needs to navigate to their WSL home folder. It is located at
\\wsl$\Ubuntu 22.04\home\<user name>, or similar, depending on the distro version.
VS Code allows you to define executable
tasks in the file .vscode/tasks.json. This repo comes with one such task defined.
{
    "version": "2.0.0",
    "tasks": [
        {
            "label": "Run WSL Setup",
            "type": "process",
            "command": "bin/install.sh",
            "options": {
                "cwd": "${workspaceFolder}",
            }
        }
    ]
}
This defines a task to run the bin/install.sh script from the repo's root folder. This task can be called by
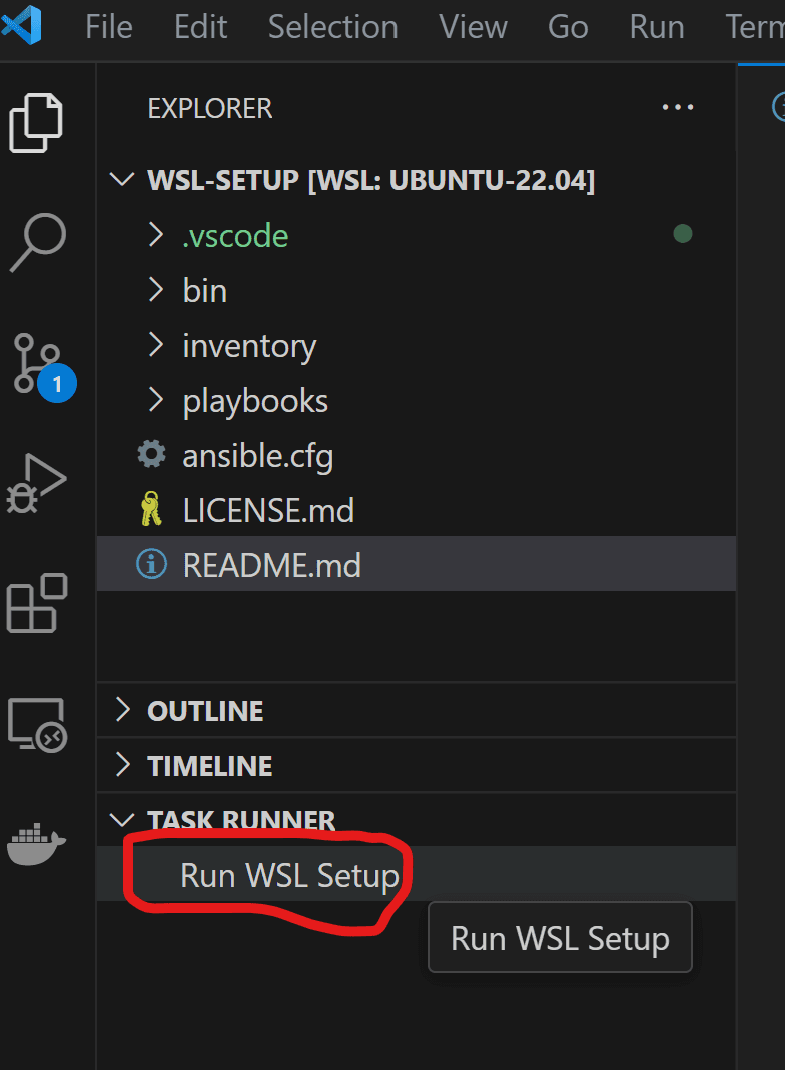
clicking Ctrl + Shift + P and typing Run Task, then selecting RUN WSL Setup from the list of options. I personally
find navigating VS Code's menus to be a bit obtuse and convoluted. There is an extension available named Task Runner
which gives the user a quick way to navigate a project's custom tasks. I recommend having the user install this
extension and just clicking on the task to run it.
This combination of task definitions and the task runner extension can come in really handy when your project has some
complex scripts that need to be occasionally run. I've found it particularly handy when developing in a Docker environment.
If a developer needs to run some command inside of a container, a button click is way easier than docker exec -it...
A Closer Look at the Install Script
The contents of bin/install.sh are fairly short. It first checks to see if pip is installed. If not it installs it.
Next it installs Ansible via pip. Then an Ansible playbook is run. This is really the heart of the script which we will
dive into shortly. Lastly, it generates an SSH key and instructs the user to add it to their GitHub profile. I added
this bit after I was shocked to discover that my belief that interacting with git via ssh is baseline developer
knowledge, proved to be false.
#!/usr/bin/env sh

# check for pip and install it if missing
python3 -m pip -V
if [ $? -ne 0 ]; then
    sudo apt-get update
    sudo apt-get install python3-pip
fi

# install ansible and run main playbook
sudo python3 -m pip install ansible
ansible-playbook playbooks/main.yml

# generate ssh key
ssh-keygen -t ed25519

echo "The following is your public ssh key. Copy it and add it to your GitHub profile."
echo "learn more here: "
echo "https://docs.github.com/en/authentication/connecting-to-github-with-ssh/adding-a-new-ssh-key-to-your-github-account"
cat ~/.ssh/id_ed25519.pub
Dissecting the Ansible Playbook
I've developed a bit of a love-hate relationship with Ansible over the years, but I think it is an excellent choice for development environment bootstrapping. If you are not familiar with Ansible, it allows you to provision a server through yaml configuration files. Their excellent documentation is available here.
Let's have a look at the main playbook file.
# main/playbook.yml
---
- hosts: localhost
  become: yes
  roles:
    - { role: base, tags: ['base'] }
    - { role: ssh, tags: ['ssh'] }
    - { role: dotfiles, tags: ['dotfiles'] }
    - { role: editors, tags: ['editors'] }
    - { role: nettools, tags: ['nettools'] }
    - { role: ntp, tags: ['ntp'] }
    - { role: sudo, tags: ['sudo'] }
  vars_prompt:
    - name: user_name
      prompt: "Enter your first and last name"
      private: false

    - name: user_email
      prompt: "Enter your email address"
      private: false
This playbook applies seven roles: base, ssh, dotfiles, editors, nettools, ntp, and sudo. Most of these roles make use
of variables set in playbooks/group_vars/all/defaults.yml. The name and email variable prompts are used for global git
configuration. I will just give a cursory explanation of the various roles. Your team's needs will be unique. This
repository is intended as a starting point.
Base Role
The main file for the base role is in playbooks/roles/base/tasks/main.yml. This is broken down into related actions.
Packages: This installs some baseline packages. The list of packages is defined in the group_vars file's base_packages variable.
You'll want to curate your own base packages. A couple I find especially helpful are python-is-python3, this package
configures the python and pip commands to link to python3 and python3-pip respectively. The other one that is
often handy in a WSL environment is dos2unix. This converts a file's Windows style return and line feed, \r\n line
endings to the Linux line feed \n. Incongruent line endings is a source of friction when working in a mixed
environment. This helps to alleviate that.
Shell: This configures the shell environment for the user. It installs both bash and zsh. By default it sets the user's shell to zsh configuring it to use oh-my-zsh and starship. These are my preferred tools. You will have your own. It's important to note that there is a fine line between setting up helpful defaults and top-down decrees. Have a conversation with your team and make tools opt-in where it makes sense for you.
SSH Role
This role makes sure that both the OpenSSH server and client are installed and configured as well as a few other ssh niceties.
Dotfiles Role
This installs GNU Stow and uses that to add some configuration files. Stow is essentially a Linux symlink manager. It Can be a really handy way to manage Linux dotfiles by storing them all in a central directory and creating symlinks to where their respective programs expect them to live. You can then put the central directory under version control. Again, dotfiles is another area where it can be easy to be heavy-handed. This role adds some really nice things for a developer like starting an ssh agent and setting up time sync.
Editors Role
This role configures a default editor, in this case neovim. It's helpful to have something like this setup if you ever need to walk someone through editing a file directly in WSL. For the most part this shouldn't be necessary as the files are accessible from Windows land.
Nettools Role
This just installs some network analysis and management tools. You devs may never actually need these, but it's helpful to have installed if they need help troubleshooting some network issue.
NTP Role
This installs and configures a Network Time Protocol utility. In this case it's actually Chrony not NTP. This makes sure that the WSL system clock is synced with an internet time server. The dotfiles role makes sure this is actually running. WSL has nothing like Systemd, so all services must be started when the session starts. It's a good idea to do this on the Windows side as well. I've had issues where a developer's time sync issues caused certs to be viewed as expired. Instructions can be found here.
Sudo Role
This role creates a "wheel" group, grants that group sudo privileges, adds the user to that group, and enables passwordless sudo. Whether or not you want to configure passwordless sudo for the user is a judgement call. To me this is essentially just their private VM, so the risk is worth the headaches it causes. I've found that far too often certain developers have no idea what their WSL password is.
Conclusion
This repository is really just supposed to act as a starting point to get you thinking how you can better anticipate your team's needs and how to sidestep some issues before they happen. You'll need to dig through the files to really see what's going on here. It's not a ton to look at and hopefully it gives you some ideas of your own.